With flat top griddles becoming more and more commonplace outside the professional capacity of diners and restaurants, the culture around home griddle cooking naturally expands as more people take up the hobby: there are more ideas about how to use griddles as there are newly established home chefs.
While industrial-grade griddles are generally unfit for amateur home use—they are simply too large, too expensive, and require powerful ventilation for liquid natural gas emissions—many brands specializing in products for outdoor cooking are now catering directly to home cooks.
You can find newer and lighter griddle plates and grills made for your average backyard as well as properly outfitted griddle stations with powerful BTUs, charcoal combos, and rear grease management.
Blackstone, for instance, offers a range of propane-fueled griddles suitable for various cooking scenarios, be it a small BBQ gathering in your backyard, a summer camping trip, or a beach holiday with your family.
Not everyone can undertake too heavy or complicated outdoor grills, so modern griddles are made to be as affordable as $60 for those who only need a few neat plates, but they can also be as expensive as pristine Blackstone ranges that go for $500 and service particularly enthusiastic foodies.
Now, you have probably seen skillful cooks operate large griddle plates a thousand times, but if you are a novice at practically everything that involves operating a griddle, there are a few tricks to master before you rush to sizzle any burgers or whip up an omelet. Perhaps the most important thing to learn before using a flat top is the correct ways of seasoning.
The extent of your seasoning work also depends on the area you will need to cover. Griddles come in a variety of sizes which often directly correspond to their power capacity: for example, smaller 17-inch plates will have one burner to service the surface, while larger 36-inch Blackstones will have four burners.
Now here is the catch: griddles are often made from cold-rolled steel which is not synthetically treated in any way. This means they are not stainless and have no additional surface coatings, so their maintenance and application differ from stainless steel plates and grills. Plain uncoated steel of Blackstone griddles can easily rust and deteriorate if not treated correctly which can ruin the flat top in no time. So this is where the titular seasoning comes into play.
Do I need to season my Blackstone griddle?
As previously mentioned, cast iron and uncoated steel surfaces—whether they are found in regular frying pans or griddle plates—need permanent protection from rust since they don’t have any synthetic layers typical of stainless steel products.
By seasoning a griddle, you not only extend its lifecycle but also significantly raise the quality of your cooking. To season a griddle is, in essence, to prepare it for future use and avoid any damage to the cast iron or uncoated steel surface. Seasoning is done by blackening the flat top with oil over the high heat in order to create a deeply set natural layer that prevents food from sticking and protects the griddle from scratches and scrapes.
The way it works is fairly simple: oil increases the structural density of the metal on a molecular level, resulting in a thick non-stick top layer that builds over time. Today you can find griddle grills that are pre-seasoned by the manufacturer, including Blackstone griddles that are often pre-seasoned for the purposes of preservation during storing and shipping. However, once you unbox your Blackstone griddle you will need you to season it yourself since this type of factory seasoning isn’t designed for immediate cooking.
Thankfully, seasoning is a fairly simple process. Blackstone griddles are meant to undergo multiple seasonings, meaning that you will need to repeat the process to keep the flat top ready for each cooking session.
- New Blackstone griddles also have to be additionally prepared before their first-ever use. The layer of protection of brand new Blackstone griddles needs to be removed so that you can get on with the actual seasoning and cooking.
- For the first time use, you will need to clean your griddle with a soapy water mixture. Only use hot water to wash the griddle surface. Mix washing powder with hot water in a standard bucket or basin and stir it well. Pour the prepared mixture over the flat top—make sure you get every nook and cranny—and then wipe it dry with paper towels.
- Remember that this only needs to be done with new griddles. If you apply soap to old flat tops you can irreversibly damage the plating and render the griddle useless. After you have successfully cleaned the new griddle, it’s time to begin the seasoning process.
Seasoning Blackstone Griddles
Since seasoning is a pretty basic procedure, you won’t need to master any complicated tools or fill your head with complex mechanics. There are only a few things you will require to have within your reach when seasoning:
- Heat resistant gloves
- Tongs (to substitute the heat resistant gloves in case you don’t own a pair)
- Paper towels (or regular white dish towels)
- Cooking oil
Once you’ve acquired all your seasoning items, it’s time to get started. It’s important to remember one very obvious thing though: only ever use your griddle outside, whether for cooking, seasoning, or cleaning. Now let’s get on with the prep:
- Without turning the heat just yet, make sure that the griddle surface is smooth and clean. In the case of previously used griddles there can be food residue, stick-on stains, and other debris, so use griddle-safe tools (such as spatulas or flat scrapers) to remove them carefully but thoroughly.

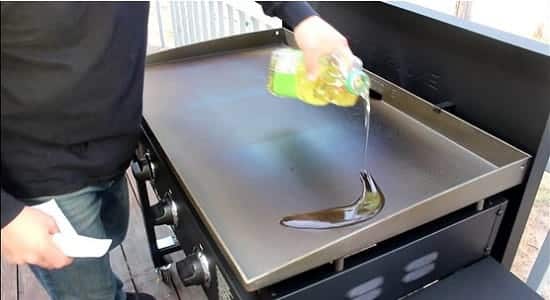
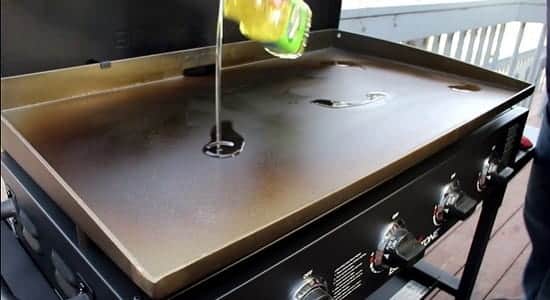
- Get the griddle to high heat and add cooking oil to the griddle surface in a manner you see fit. A light coating will do just fine for the first layer.
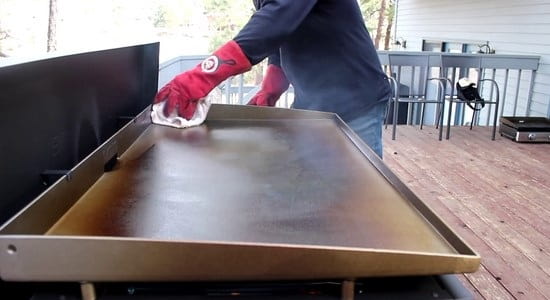
- Spread the oil all over the griddle using either paper towels or regular white dish towels. Protect your hands with heat resistant gloves when distributing the oil or use a pair of tongs to guide your paper towels around the flat top. Don’t forget to slather the inner sides and corners of the griddle.
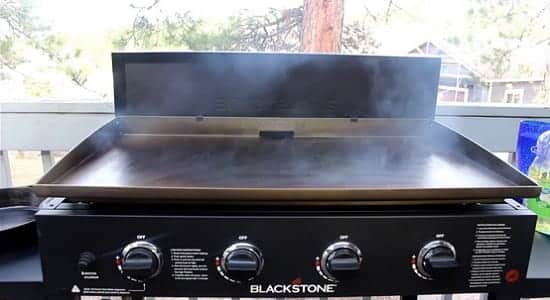
- Leave the oil on high heat for approximately 20 minutes or until the oil layer burns off. A black pattern should already start emerging.
- Add another layer of oil and repeat the process. Each griddle plate is slightly unique in terms of surface patterns, so during seasoning, the black layer that forms may look different from what you may see on other griddles.
- Once the second layer is burned off, add oil for the third time and wait for the coating to burn off once again. Regardless of how many times you decide to season the griddle with oil, the overall process should take between 45 minutes and an hour. By the time you are done, the surface should be evenly blackened.
- If you don’t plan to cook right away, let the griddle cool off and put it away; the storage place should be dry to prevent rust formation.
- If you want to fully season the griddle, you may grill your first meal without worry. It’s better to cook something juicy and spread it all over the surface to let the grease set in, leaving your Blackstone griddle sticky after seasoning.
- Once the prepared meal is taken off the griddle, clean the surface and food debris through the rear grease management system. When it comes to Blackstone griddle cleaning, the advice for proper conduct varies from person to person and should be done according to how often you plan to use your flat top.


A griddle’s seasoning develops over time. The more you cook, the blacker and shinier the griddle’s surface becomes, while its rust-resistant and non-stick qualities improve with every use. Moreover, this approach means that your cooking will be marked by deep rich flavors that can’t be replicated on synthetically-coated grills.
What is the best oil to season a Blackstone griddle?
Griddling is not exactly a complex scientific process that requires you to use only specific oils and apply them in the most careful of measurements. While there are many experienced griddlers who will swear that the oil they use is the only correct oil for seasoning a griddle, the truth of the fact is: the oil type doesn’t affect the quality of seasoning in any noticeable way.
Some people also like to add lard or other fatty substances to increase the effectiveness of the coating and add more to the flavor of the meal. With newly seasoned Blackstone griddles you can also try and combine a few dishes at ones on your first run, for example, you can make breakfast foods such as a steak omelet while preparing burrito fillings on the side.
This could contribute to your freshly seasoned coating while giving you a chance to see how your griddle handles different types of products.
Do you need to use flaxseed oil for Blackstone griddle?
Like many other griddle grills, Blackstone griddles can be seasoned with any vegetable oil designed for cooking. Some home cooks will try to convince you that only flaxseed oil can provide safe and thorough seasoning, but it simply isn’t true.
Though flaxseed oil is of course very good for your Blackstone griddle, not to mention it’s rich in omega-3 fatty acids that can be beneficial for your personal health. That being said, you can season your griddle with literally any recommended vegetable oil. (1)
This includes corn oil, sunflower seed oil, olive oil, sesame oil, palm oil, cottonseed oil, coconut oil, and even soybean oil. One of the most affordable options for seasoning is canola oil that would cost you much less than, say, sesame or olive oil but will result in the same evenly blackened griddle surface. (2)
Common Blackstone griddle problems and how to prevent them
Most common mistakes that new users make when breaking in their Blackstone griddles all involve incorrect storage, insufficient seasoning, and application of harmful substances, whether by accident or due to misinformation.
There are only a few simple things to remember before you get ready to fully use your Blackstone griddle, but they make a huge difference for your safety and the griddle’s longevity.
- When washing a brand new griddle, use soap powder only once. Do not apply soap mixtures unwisely to older or previously used griddles and always check with your manual first.
- When you season the griddle, pay attention to get cooking oil inside every corner so the surface gets blackened uniformly. If the griddle isn’t evenly seasoned, you will get rust on your hands in no time. Moreover, your food wouldn’t just taste as good as it actually can.
- When you are finished with your seasoning (it doesn’t matter how many coatings you choose to go for, three or five or even eight), the now dry and black griddle should be wiped with a thin layer of cooking oil. The same one you’ve been using for the seasoning should be fine. Again, use paper towels to spread it evenly. This additional oil coat can keep your griddle safe from oxidation.
- Find a reliable protective cover for the griddle when you put it in storage. It should be strong enough to prevent premature corrosion and rust from forming on the griddle surface.
- Every time you cook, you will probably have bits and pieces of food stuck to the surface. Always remove them before putting the griddle away. It’s easy enough to do—you will only need to slightly heat up the griddle again and pour some water over the stuck-on particles. If the stains are too stubborn, add regular salt (just a teaspoon would do) to the problematic areas and pour water over them. Pay in mind, the griddle should still be hot. After it all burns off, simply wipe off the residue with paper towels. Now your griddle is good for storage.

Leave a Comment